silverstripe / silverstripe-headless
Silverstripe CMS headless features
Installs: 1 225
Dependents: 2
Suggesters: 0
Security: 0
Stars: 5
Watchers: 10
Forks: 8
Open Issues: 4
Type:silverstripe-vendormodule
Requires
- firebase/php-jwt: ^5.4
- guzzlehttp/guzzle: ^7.0
- silverstripe/cms: ^4.4
- silverstripe/cms-events: *
- silverstripe/graphql: ^4
- sminnee/silverstripe-apikey: dev-master
- symbiote/silverstripe-grouped-cms-menu: ^4
- unclecheese/display-logic: ~2.0
This package is auto-updated.
Last update: 2024-03-29 04:26:41 UTC
README
This module provides several core features for building headless websites with Silverstripe CMS. While it is used primarily in support of the silverstripe/silverstripe-nextjs module, it is framework agnostic and could be used as a platform for any headless solution.
Installation
This module requires the pre-release of silverstripe/graphql version 4. Please see
the installation instructions for using version 4 in a stable release of silverstripe/recipe-cms.
Once you have silverstripe/graphql:^4 installed, you can add this module
using a standard composer installation.
composer require silverstripe/silverstripe-headless
Features
- Bulk loading of models into the schema, e.g.
MyApp\Models\* - Several helper fields added to all dataobjects (
hashID,typeAncestry,exists, etc.) - Webhooks (incoming and outgoing)
- Published state (awaiting publication / publish history)
- API Key authentication (see sminnee/silverstripe-apikey)
- All
ContentControllerrequests 404 (e.g. no frontend) - Base URL redirects to
/admin - DataObject change tracking to provide transparency of what will be published
Getting started
You'll first want to decide which models you want exposed to your content API. This is done with an allow list rather than an exclude list. You can wildcard namespaces to make this easier.
To include models, update the config on SilverStripe\Headless\GraphQL\ModelLoader. Here is the default configuration:
SilverStripe\Headless\GraphQL\ModelLoader:
  included_dataobjects:
    page: 'Page'
    cms: 'SilverStripe\CMS\Model\SiteTree'
    siteconfig: 'SilverStripe\SiteConfig\*'
    assets: 'SilverStripe\Assets\*'
    elemental: 'DNADesign\Elemental\Models\*'
Include a similar config in your project.
app/_config/modelLoader.yml
SilverStripe\Headless\GraphQL\ModelLoader:
  included_dataobjects:
    - MyApp\Models\*
    - SomeModule\Models\SomeModel
    # etc...
Need help generating this list? Use config generation tool.
It can get quite granular deciding what models to include and which to leave out, particularly when you have a lot of modules installed. To help generate this list, use your browser and navigate to /dev/generate-included-classes.
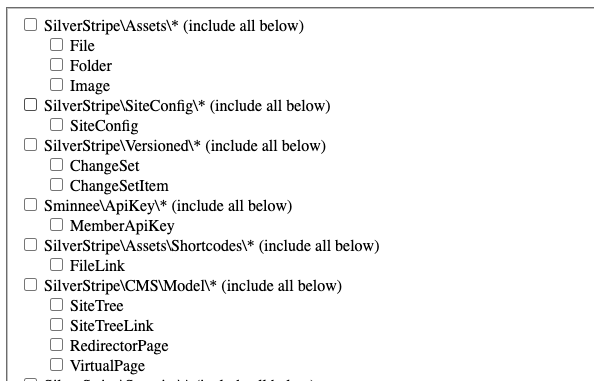
It's a crude UI, but it will provide you with checkboxes for every DataObject class in the system and generate a corresponding config for you.
Accessing the GraphQL API
The API should be all wired up on /graphql with read and readOne operations for each of your exposed DataObjects. Use the GraphQL IDE supplied by silverstripe/graphql-devtools to browse the API and try out some queries.
Other features
Extra dataobject fields
hashID: String!: A unique ID across the entire database. Based on aID / baseClasstuple.typeAncestry: [[String]]: A list of all the ancestral types for this model. e.g.[BlogPage, Page, SiteTree]exists: Boolean!: Useful in rendering or hiding UI -- check if the model'sexists()function returns true.
Webhooks
Webhooks are a key part of making a headless set up work. It's the primary way that the CMS communicates with the headless instance (e.g. Netlify, Vercel).
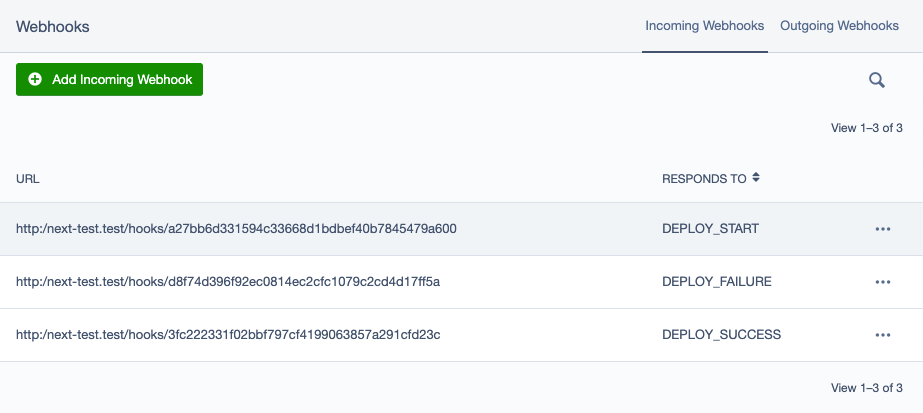
Incoming webhooks
By default, three incoming webhooks are provided -- one for each deploy event: DEPLOY_START | DEPLOY_FAILURE | DEPLOY_SUCCESS.
Outgoing webhooks
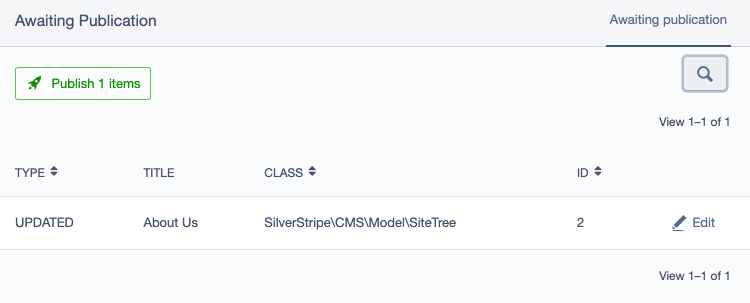
The most important outgoing webhook you'll want to define is a "Publish" webhook, which will be invoked when the "publish" button is clicked in the "Awaiting publication" view.

The "publish" hook specifically has two types of behaviour associated with it:
-
OPTIMISTIC: Mark the content published, and don't wait for confirmation from the hosting provider. If your hosting provider doesn't provide outgoing webhooks, this may be necessary, but it's not recommended, as publishes can fail for a number of reasons. -
DEFER: Mark the content as "pending" publication, and wait to mark it published until an incoming webhook, e.g.DEPLOY_SUCCESSis received. Netlify offers outgoing webhooks free for all sites. See below.
You can test a webhook by clicking "Invoke webhook". If a 200 response is received, you'll get a green status message.
Authenticating incoming requests (Netlify only)
Netlify allows you to send a JWT-signed message with its outgoing webhook calls. If you're using Netlify, it's a good idea to take advantage of this feature to minimise the exploit surface of your CMS instance.
All you need to do is define an arbitrary secret in the NETLIFY_JWS_SECRET environment variable (e.g. a random 64-character string), and provide this same secret to the outgoing webhook defined in Netlify. When it fires the outgoing webhook event, Silverstripe will check the signature on the request to validate authenticity.
Publishing content
Publication is a manual process. A publish to the hosting provider is not triggered on every single publish to the database. The assumption is that content changes can happen rapidly and many are ephemeral (i.e. fixing typos in haste) and continuous content deployment isn't always a great fit, although this feature is inconsideration for the future.
As changes happen in the CMS, the content changes are tracked. Any changes to DataObjects that are exposed to your API will be recorded in the "Awaiting Publication" admin, where you can publish them.
Once changes are published, they get added to the "Publish history" view.
API key authentication
All members can generate API keys. See the "Api keys" tab on the detail view of every member. Passing this key in the graphql request in the X-API-Key header will authenticate as the member associated with that key. This is useful
for reading draft or other protected content.
Further reading
See the silverstripe/silverstripe-nextjs module for a more detailed implementation of the features provided by this module.